AR# 52881
|Configuration - BitStream Encryption - How to create and program an encrypted bitstream
描述
How do I generate an encrypted bitstream and how do I program the encryption keys into the FPGA?解决方案
Xilinx FPGAs support several bitstream encryption methods including AES, HMAC and DNA.These methods are detailed in the FPGA's respective configuration user guide found on Xilinx.com.
We strongly urge customers to read the configurations user guide to familiarize themselves with where Xilinx stands on bitstream security and what available options there are as well as information on how to implement them.
You will also need to use external encryption devices to protect your design.
You can read the device to get a key and calculate a verification code.
Here is a reference design that details a similar implementation:
http://www.xilinx.com/support/documentation/application_notes/xapp780.pdf
Note that this is all that is available regarding this implementation and you will need to modify the reference design and code provided if you chose to pursue this route.
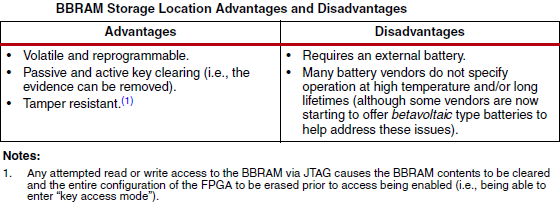
When selecting BBRAM or eFUSE storage options, it is highly recommended that you consider their use properties and what satisfies your design requirements better.
Please refer to the following tables and notes on each of their use advantages/disadvantages.
More on each of these storage options can be found in the respective devices User guide.
Please refer to the following tables and notes on each of their use advantages/disadvantages.
More on each of these storage options can be found in the respective devices User guide.


The following is general information about bitstream encryption with Xilinx devices.
Virtex-6 and 7-Series devices support the use of both HMAC and AES keys.
Spartan devices only have the AES key option.
Also compression and encryption together are only supported for Virtex-6 and 7 Series devices.
Refer to (Xilinx Answer 37413).
Only the three largest Spartan-6 devices support bitstream Encryption(XC6SLX75 / 75T, XC6SLX100 / 100T & XC6SLX150 / 150T).
The HMAC key is included in bitstream and does not need to be programmed to FPGA unlike the AES key.
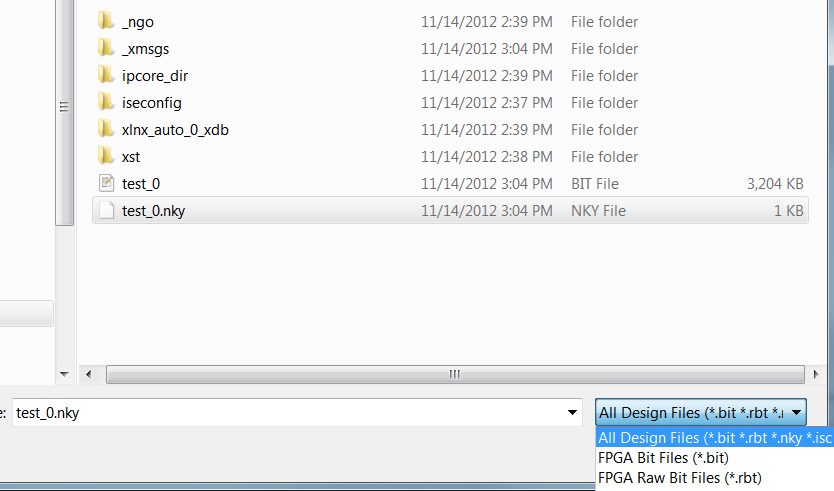
The HMAC key is contained in the same NKY key file as the AES encryption key as well as the BIT file.
Users can perform readback through the ICAP interface even if bitstream encryption is used.
An unencrypted bitstream can be loaded to configure the device even when a device holds an encryption key, given that POR or PROG asserted first clearing out the configuration memory.
Note that once the FUSE_CNTL[0] bit is programmed, only bitstreams encrypted with the eFUSE key can be used to configure the FPGA.
The NKY files can be either supplied to BitGen or created in BitGen by supplying the keys.
If a HMAC key is not supplied, BitGen automatically generates one for you.
If a HMAC key is not supplied, BitGen automatically generates one for you.
However, the key is however not loaded into the FPGA device directly via JTAG like the AES key.
It is contained and protected (wrapped) by the encrypted bitstream.
During the on-chip decryption process, this HMAC key is extracted from the bitstream and used by the authentication algorithm (i.e., no on-chip key storage for the HMAC key is required).
The NKY file format is: KEY HMAC/(0 for AES) <hex string> (256 bit HMAC/AES key)
The following is an example NKY file:

The StartCBC BitGen setting is an option and not mandatory.
Xilinx AES bitstream encryption uses a technique called Cipher Block Chaining (CBC) with a 256-bit AES key.
CBC ensures that two different parts of the bitstream that have the same actual values (for example, all zeros) encrypt to different patterns.
This prevents an attacker from decrypting xilinx bitstream based on seen patterns.
CBC needs a starting random number (Initialization Vector).
AES/HMAC KEY Flow for BBRAM & EFUSE(ISE/Vivado & IMPACT/HW-Session):
(ISE):
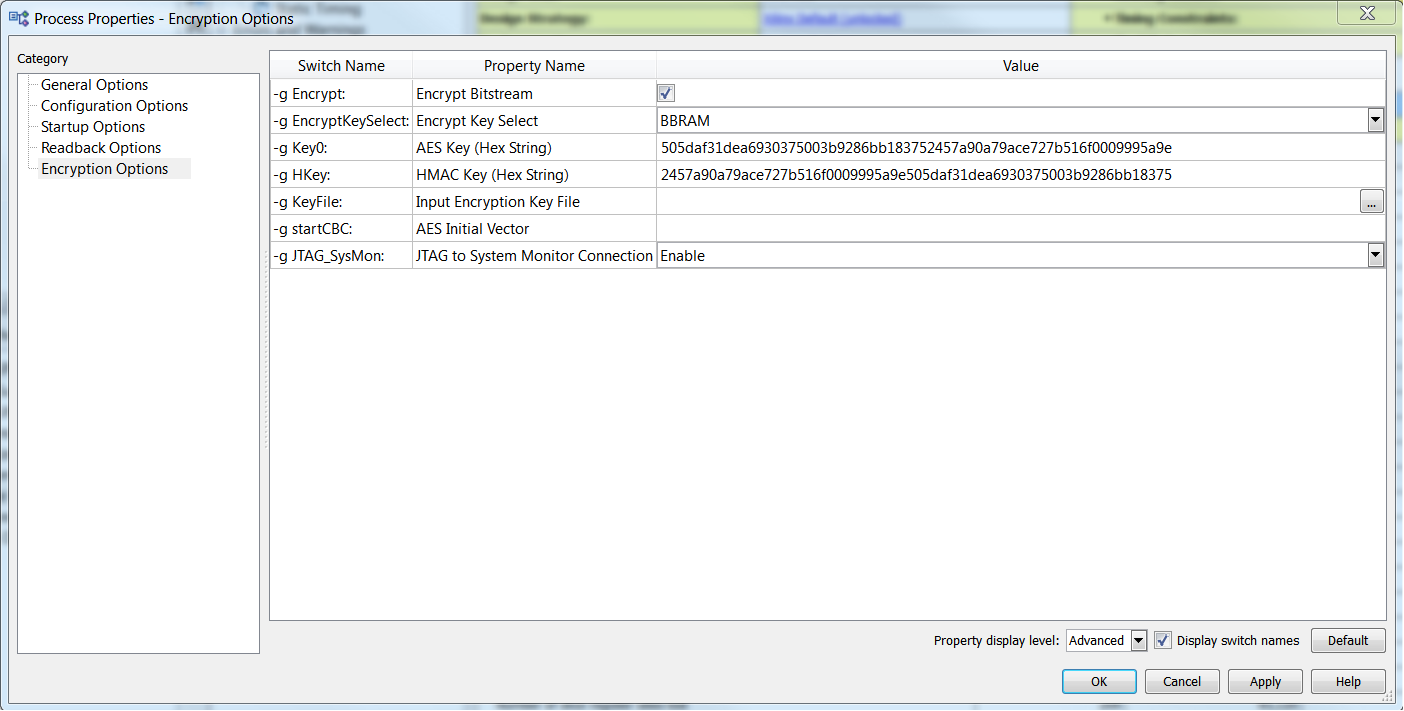
1) Enable the Encryption BitGen setting after implementing the design.
2) Select BBRAM or EFuse for the Encryption scheme, then enter the HMAC and/or AES Key and run BitGen to generate an NKY(key) and/or BIT(config) file.
- Both HMAC and AES keys are required for Virtex 6 and 7 series devices.
- If you have the Encryption enabled but do not specify the keys or the AES initial vector, BitGen will randomly generate them.

Vivado:
Note: See (UG908) for more info on Programming and Debugging with the Vivado Flow.
Bitstream options in Vivado are set in the design itself via the design's XDC file.
Follow the below steps to enable and set bitstream encryption for your Vivado design:
Follow the below steps to enable and set bitstream encryption for your Vivado design:
1) Open your design post-Synthesis or post-Implementation and open your XDC by double clicking it under the constraints drop down from the project sources window.
2) In your XDC file set the following property to enable bit stream encryption:
set_property BITSTREAM.ENCRYPTION.ENCRYPT Yes [current_design]
3) Reference Table A-1 of "Device Configuration Bitstream Settings" section in (UG908) to similarly set the rest of the encryption options in your XDC or Tcl script.
4) An example would look like below:

Note: These can also be set via Tcl and be reflected in the XDC, either by using the Tcl console or scripting in Tcl.
5) After generating the bitstream you can either launch iMPACT or open a Hardware Session and follow one of the below sections.
Note: To report all of the BITSTREAM properties you can use the following to list all bit-stream properties.
report_property -all [current_design] BITSREAM*
You can be even more exclusive and use:
report_property -all [current_design] BITSREAM.CONFIG*
Or
report_property -all [current_design] BITSREAM.ENCRYPTION*
If the default values are listed, you can use the following for each property you want check.
list_property_value -default <property> [current_design]
Programming the Encrypted Bitstream Via IMPACT and Vivado Hardware session:
IMPACT:
1) First, download the NKY file to the FPGA in the same way as you would a BIT file using the "assign configuration file" right click option on the selected device.
Note: The NKY file should be generated in the same project directory as the BIT file.


2) Then you can configure the FPGA with the Encrypted or non-Encrypted BIT file, in which case the key is ignored.
Please refer to the Configuration user guides or (Xilinx Answer 39389) for different configuration options that free up or become restricted when using an Encrypted vs non Encrypted bitstream with AES key.
Hardware Session:
Note: See (UG908) for more info on Programming and Debugging with the Vivado Flow.
1) Launch a Hardware Session under Program and Debug in the Flow Navigator window.
2) Open an existing/recent hardware target or connect to a new one via the Connection Wizard.
3) set the appropriate hardware properties as per the device/board.
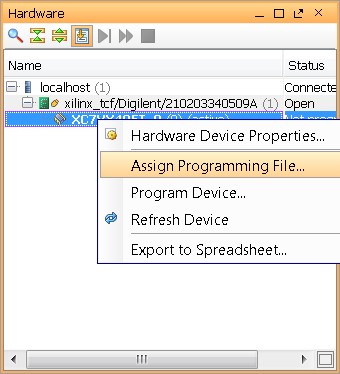
4) Assign the NKY file and the BIT files as shown below by right clicking on your target device.


AES/HMAC KEY switches (Command Line) and description for BBRAM & EFUSE:
ISE BitGen Option Settings & CMD Line Switches for Encryption:
Example Commands:
| -g Encrypt: | Encrypt Bitstream | Enable/Disable to encrypt the bitstream. |
| -g HKey: | HMAC Key (Hex String) | Allows a HMAC key to be specified. Will be written into the Key file. |
| -g KeyFile: | Input Encryption Key File | Contains part AES key and part AES initial vector. BitGen creates random key and vector if not specified. |
| -g startCBC: | AES Initial Vector | Allows the initial vector to be specified. Will be written into the Key file. |
Basic BitGen encryption command for Spartan-6:
bitgen -w -g Encrypt:Yes -g Key0:XXXXXXXXXXXXXXXXXXXXXXXXXXXXX system.ncd
A more detailed BitGen command for Virtex-6 or 7 series device:
bitgen -w -g Encrypt:Yes -g EncryptKeySelect:efuse -g Key0:XXXXXXXXXXXXXXXXXXXXXXXXXXXXX -g HKey:XXXXXXXXXXXXXXXXXXXXXXXXXXXXX -g compress system.ncd system.bit system.pcf
A more complicated command using different available options:
bitgen -w -g Security:Level2 -g Encrypt:Yes -g KeyFile:XXX.nky -g StartCBC:XXXXXXXX -g JTAG_SysMon:Disable -g compress system.ncd system.bit system.pcf
Please Refer to the 14.4 Command Line Users Guide for more information regarding additional BitGen options/switches.
http://www.xilinx.com/support/documentation/sw_manuals/xilinx14_3/devref.pdf
http://www.xilinx.com/support/documentation/sw_manuals/xilinx14_3/devref.pdf
Please Refer to XAPP1084 for more detailed information regarding Bitstream Encryption/Decryption for Virtex-6 and 7 Series.
http://www.xilinx.com/support/documentation/application_notes/xapp1084_tamp_resist_dsgns.pdf
本答复记录是否对您有帮助?
| AR# 52881 | |
|---|---|
| 日期 | 06/09/2015 |
| 状态 | Active |
| Type | 解决方案中心 |
| 器件 | |
| Tools | |
People Also Viewed